Lazy Layout
Published on July 22, 2023 under the tag haskell
Prelude
This blogpost is written in reproducible Literate Haskell, so we need some imports first.
Show me the exact imports…
{-# LANGUAGE DeriveFoldable    #-}
{-# LANGUAGE DeriveFunctor     #-}
{-# LANGUAGE DeriveTraversable #-}
module Main where
import qualified Codec.Picture          as JP
import qualified Codec.Picture.Types    as JP
import           Control.Monad.ST       (runST)
import           Data.Bool              (bool)
import           Data.Foldable          (for_)
import           Data.List              (isSuffixOf, partition)
import           Data.List.NonEmpty     (NonEmpty (..))
import           System.Environment     (getArgs)
import           System.Random          (RandomGen, newStdGen)
import           System.Random.Stateful (randomM, runStateGen)
import           Text.Read              (readMaybe)
Introduction
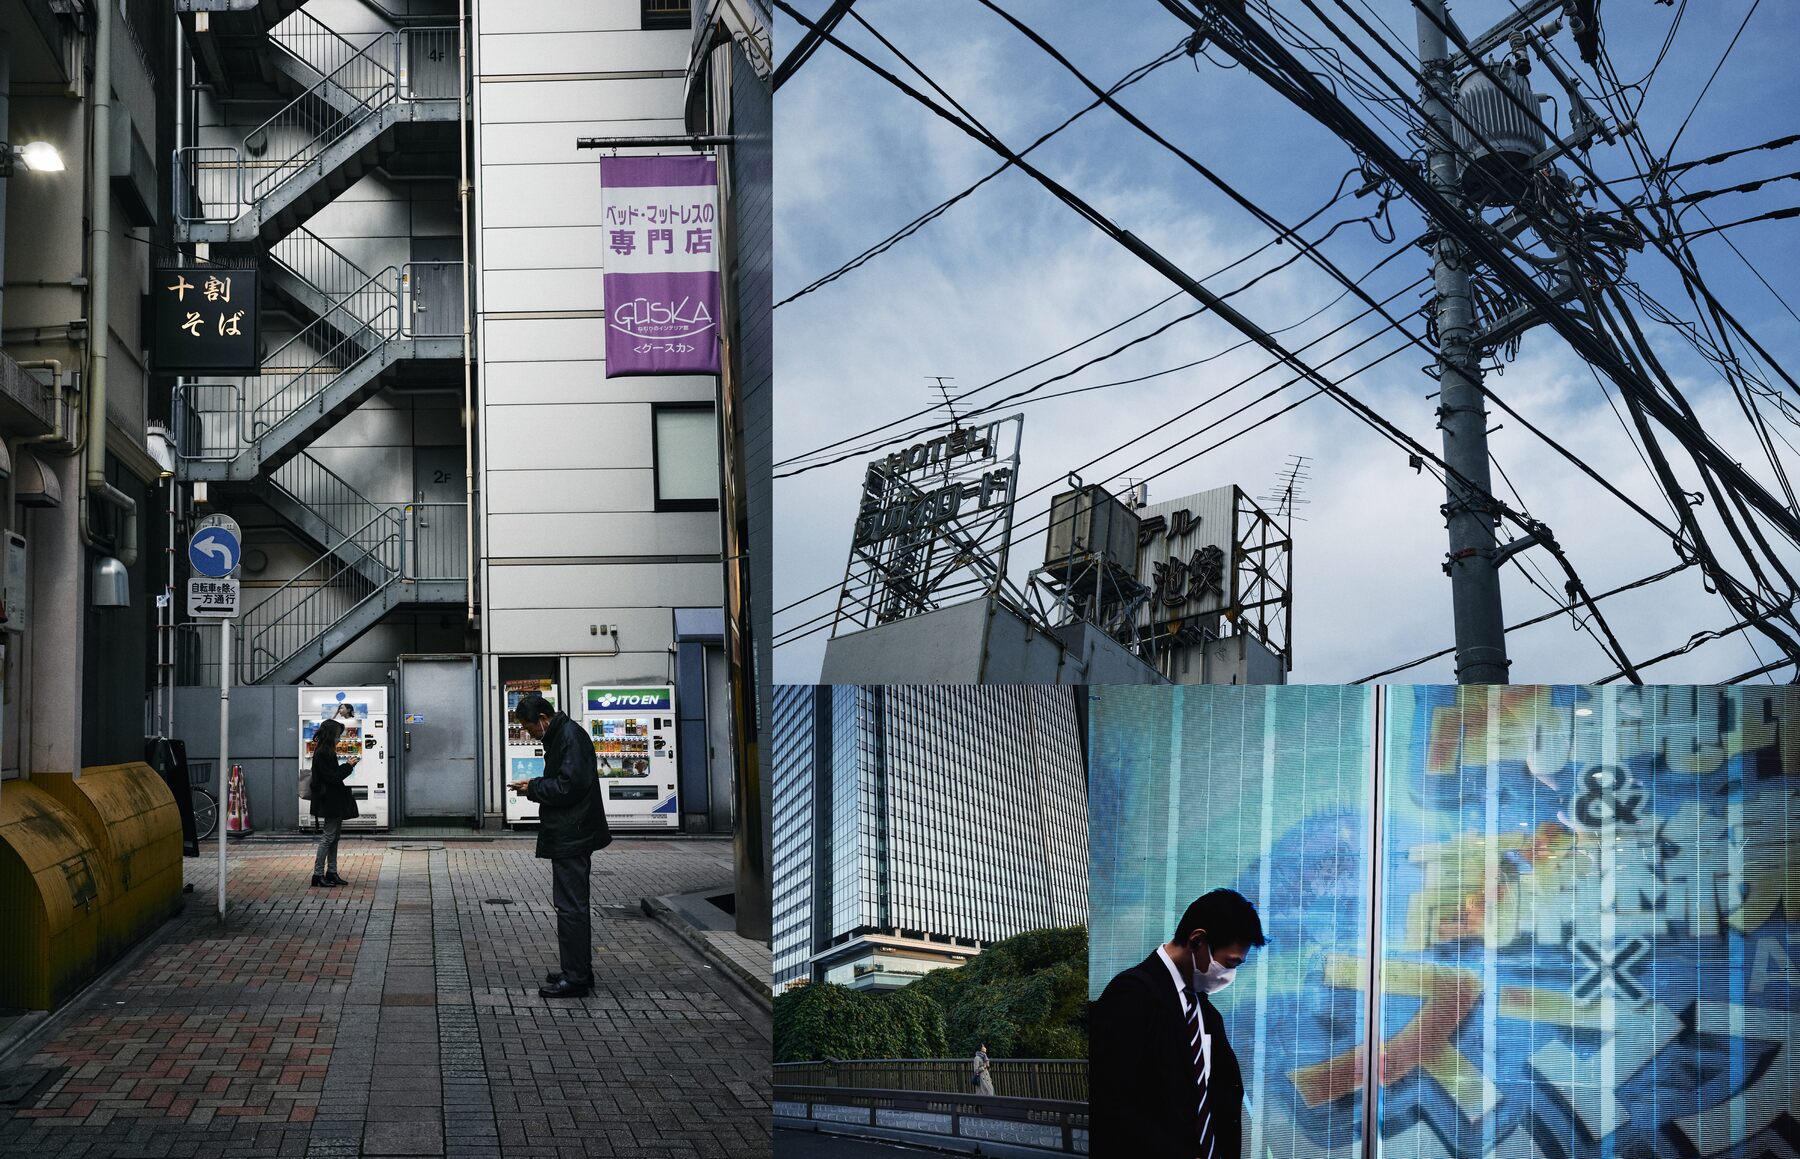
Haskell is not my only interest — I have also been quite into photography for the past decade. Recently, I was considering moving some of the stuff I have on various social networks to a self-hosted solution.
Tumblr in particular has a fairly nice way to do photo sets, where these can be organised in rows and columns. I wanted to see if I could mimic this in a recursive way, where rows and columns can be subdivided further.
One important constraint is that is that we want to present each picture as the photographer envisioned it: concretely, we can scale it up or down (preserving the aspect ratio), but we can’t crop out parts.
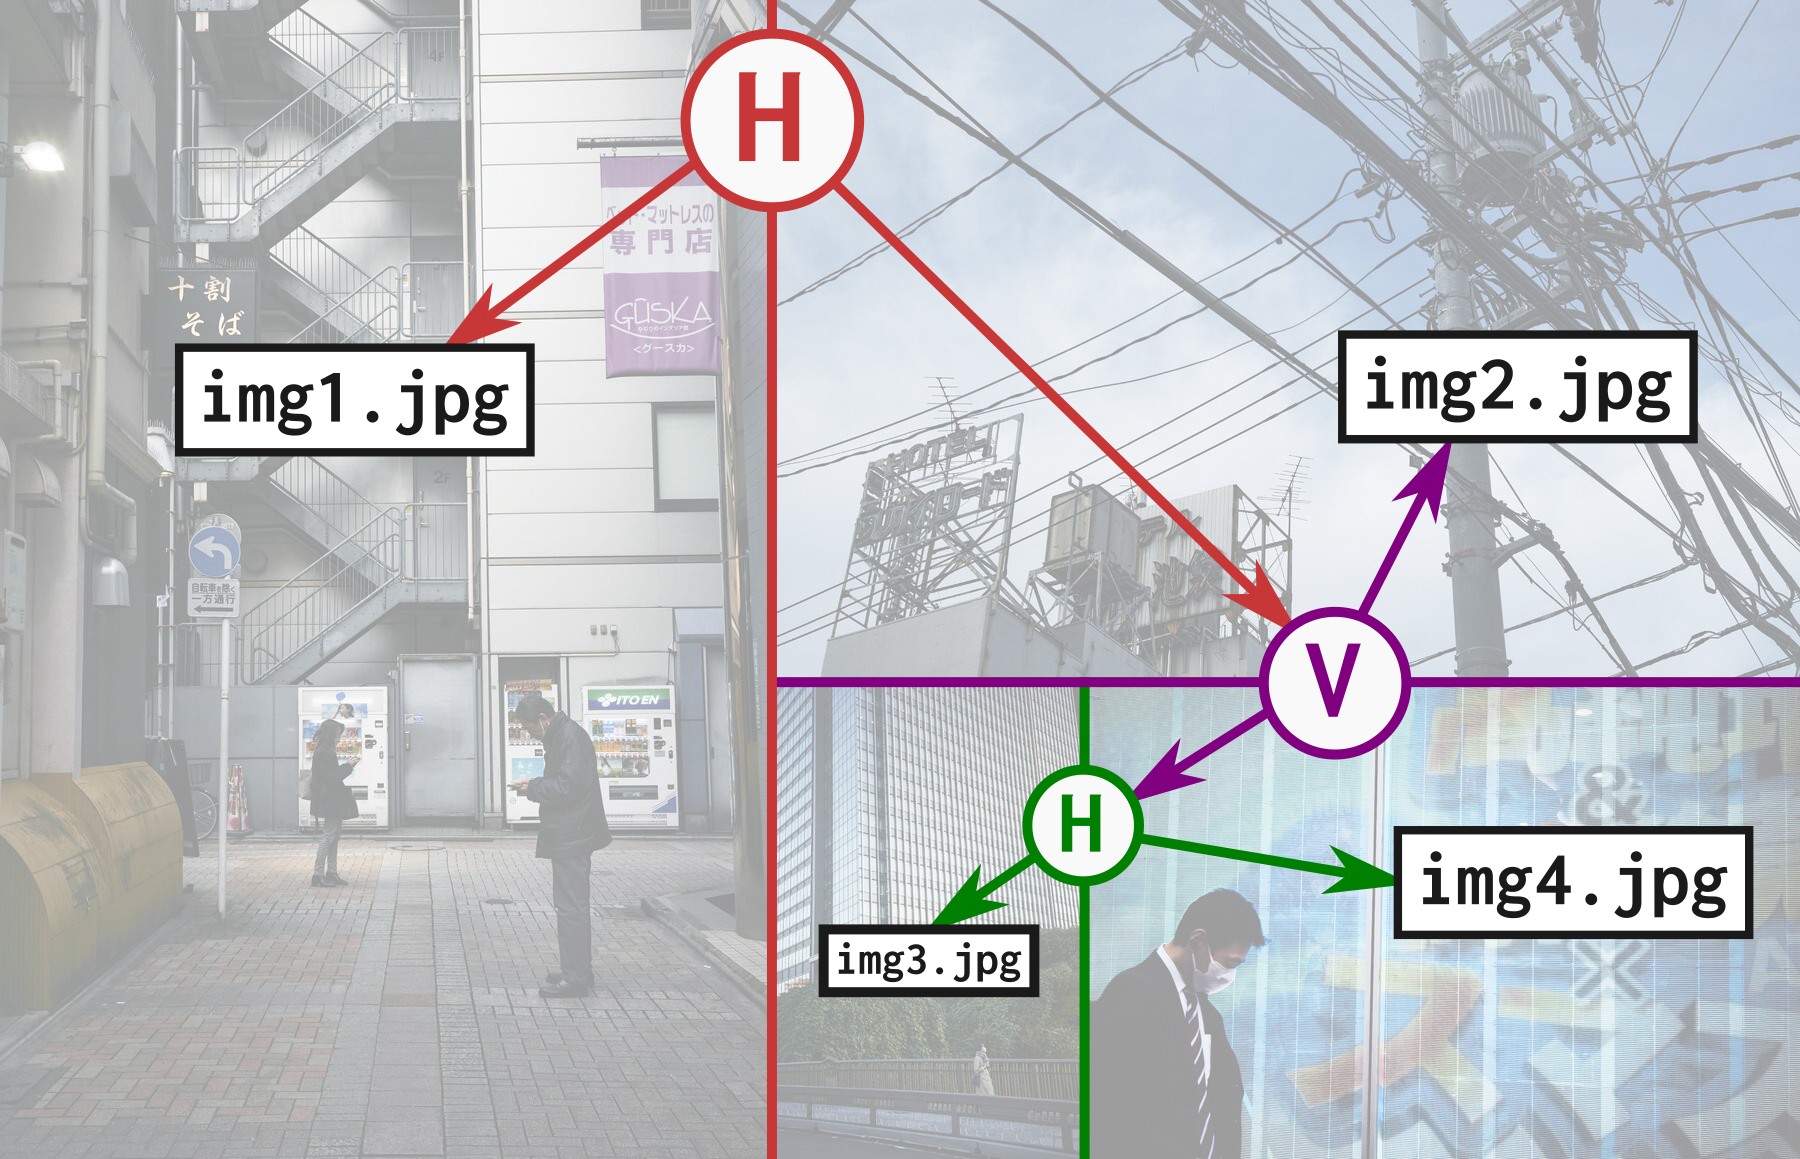
Order is also important in photo essays, so we want the author to specify the photo collage in a declarative way by indicating if horizontal (H) or vertical (V) subdivision should be used, creating a tree. For example:
H img1.jpg
  (V img2.jpg
     (H img3.jpg
        img4.jpg))
The program should then determine the exact size and position of each image, so that we get a fully filled rectangle without any borders or filler:
We will use a technique called circular programming that builds on Haskell’s
laziness to achieve this in an elegant way.
These days, it is maybe more commonly referred to as the repmin problem.
This was first described by Richard S. Bird in “Using circular programs to
eliminate multiple traversals of data” in 1984, which predates Haskell!
Give me a refresher on repmin please…
Interlude: repmin
Given a simple tree type:
data Tree a
  = Leaf a
  | Branch (Tree a) (Tree a)
We would like to write a function repmin which replaces each value in each
Leaf with the global minimum in the tree. This is easily done by first
finding the global minimum, and then replacing it everywhere:
repmin_2pass :: Ord a => Tree a -> Tree a
repmin_2pass t =
  let globalmin = findmin t in rep globalmin t
 where
  findmin (Leaf x)     = x
  findmin (Branch l r) = min (findmin l) (findmin r)

  rep x (Leaf _)     = Leaf x
  rep x (Branch l r) = Branch (rep x l) (rep x r)
However, this requires two passes over the tree. We can do better by using Haskell’s laziness:
repmin_1pass :: Ord a => Tree a -> Tree a
repmin_1pass t = t'
 where
  (t', globalmin) = repmin t

  repmin (Leaf   x)   = (Leaf globalmin, x)
  repmin (Branch l r) =
    (Branch l' r', min lmin rmin)
   where
    (l', lmin) = repmin l
    (r', rmin) = repmin r
There is an apparent circular dependency here, where repmin uses globalmin,
but also computes it. This is possible because we never need to evaluate
globalmin – it can be stored as a thunk.
For more details, please see the very accessible original paper
(https://doi.org/10.1007/BF00264249).
Starting out with some types
We start out by giving an elegant algebraic definition for a collage:
data Collage a
  = Singleton  a
  | Horizontal (Collage a) (Collage a)
  | Vertical   (Collage a) (Collage a)
  deriving (Foldable, Functor, Show, Traversable)
We use a higher-order type, which allows us to work with collages of filepaths
as well as actual images (among other things). deriving instructs the compiler
to generate some boilerplate code for us. This allows us to concisely read all
images using traverse:
readCollage
  :: Collage FilePath
  -> IO (Collage (JP.Image JP.PixelRGB8))
readCollage = traverse $ \path ->
  JP.readImage path >>=
  either fail (pure . JP.convertRGB8)
We use the JuicyPixels library to read and write images. The image type in this library can be a bit verbose since it is parameterised around the colour space.
During the layout pass, we don’t really care about this complexity. We only need the relative sizes of the images and not their content. We introduce a typeclass to do just that:
data Size = Sz
  { szWidth  :: Rational
  , szHeight :: Rational
  } deriving (Show)

class Sized a where
  -- | Retrieve the width and height of an image.
  -- Both numbers must be strictly positive.
  sizeOf :: a -> Size
We use the Rational type for width and height.
We are only subdividing the 2D space, so we do not need irrational numbers,
and having infinite precision is convenient.
The instance for the JuicyPixels image type is simple:
instance Sized (JP.Image p) where
  sizeOf img = Sz
    { szWidth  = fromIntegral $ JP.imageWidth  img
    , szHeight = fromIntegral $ JP.imageHeight img
    }
Laying out two images
If we look at the finished image, it may seem like a hard problem to find a configuration that fits all the images with a correct aspect ratio.
But we can use induction to arrive at a fairly straightforward solution. Given two images, it is always possible to put them beside or above each other by scaling them up or down to match them in height or width respectively. This creates a bigger image. We can then repeat this process until just one image is left.
However, this is quite a naive approach since we end up making way too many copies, and the repeated resizing could also result in a loss of resolution. We would like to compute the entire layout first, and then render everything in one go. Still, we can start by formalising what happens for two images and then work our way up.
We can represent the layout of an individual image by its position and size. We use simple (x, y) coordinates for the position and a scaling factor (relative to the original size of the image) for its size.
data Transform = Tr
  { trX     :: Rational
  , trY     :: Rational
  , trScale :: Rational
  } deriving (Show)
Armed with the Size and Transform types, we have enough to tackle the
“mathy” bits.
Let’s look at the horizontal case first and write a function that computes a transform for both left and right images, as well as the size of the result.
horizontal :: Size -> Size -> (Transform, Transform, Size)
horizontal (Sz lw lh) (Sz rw rh) =
We want to place image l beside image r, producing a nicely filled
rectangle. Intuitively, we should be matching the height of both images.
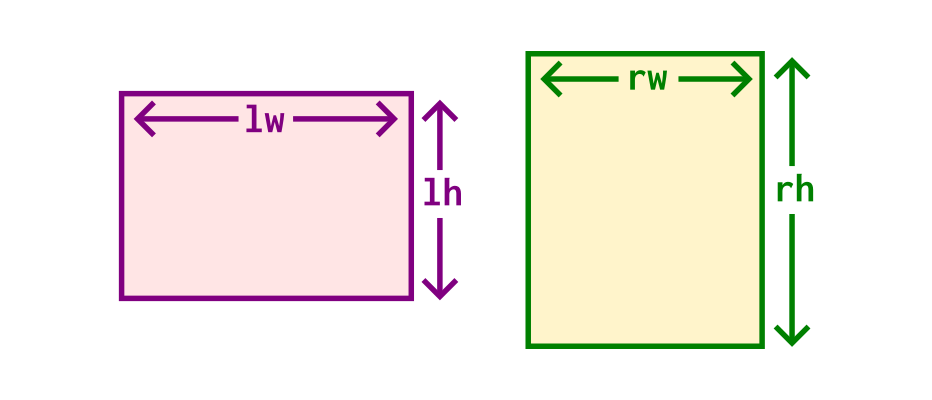
There are different ways to do this — we could shrink the taller image, enlarge the shorter image, or something in between. We make a choice to always shrink the taller image, as this doesn’t compromise the sharpness of the result.
  let height = min lh rh
      lscale = height / lh
      rscale = height / rh
      width  = lscale * lw + rscale * rw in
With the scale for both left and right images, we can compute the left and right transforms. The left image is simply placed at (0, 0) and we need to offset the right image depending on the (scaled) size of the left image.
  ( Tr 0             0 lscale
  , Tr (lscale * lw) 0 rscale
  , Sz width height
  )
Composing images vertically is similar, just matching the widths rather than the heights of the two images and moving the bottom image below the top one:
vertical :: Size -> Size -> (Transform, Transform, Size)
vertical (Sz tw th) (Sz bw bh) =
  let width  = min tw bw
      tscale = width / tw
      bscale = width / bw
      height = tscale * th + bscale * bh in
  ( Tr 0 0             tscale
  , Tr 0 (tscale * th) bscale
  , Sz width height
  )
Composing transformations
Now that we’ve solved the problem of combining two images and placing them, we can apply this to our tree of images. To this end, we need to compose multiple transformations.
Whenever we think about composing things in Haskell, it’s good to ask ourselves
if what we’re trying to compose is a Monoid. A Monoid needs an identity
element (mempty) and a Semigroup instance, the latter of which contains just
an associative binary operator (<>).
The identity transform is just offsetting by 0 and scaling by 1:
instance Monoid Transform where
  mempty = Tr 0 0 1
Composing two transformations using <> requires a bit more thinking.
In this case, a <> b means applying transformation a after transformation
b, so we will need to apply the scale of b to all parts of a:
instance Semigroup Transform where
  Tr ax ay as <> Tr bx by bs =
    Tr (ax * bs + bx) (ay * bs + by) (as * bs)
Readers who are familiar with linear algebra may recognise the connection to a sort of restricted affine 2D transformation matrix.
Proving that the identity holds on mempty is simple so we will only do one
side, namely a <> mempty == a.
Proof of Monoid right identity…
Tr ax ay as <> mempty

-- Definition of mempy
= Tr ax ay as <> Tr 0 0 1

-- Definition of <>
= Tr (ax * 1 + 0) (ay * 1 + 0) (as * 1)

-- Cancellative property of 0 over +
-- Identity of 1 over *
= Tr ax ay as
Next, we want to prove that the <> operator is associative, meaning
a <> (b <> c) == (a <> b) <> c.
Proof of associativity…
Tr ax ay as <> (Tr bx by bs <> Tr cx cy cs)

-- Definition of <>
= Tr (ax * (bs * cs) + (bx * cs + cx))
     (ay * (bs * cs) + (by * cs + cy))
     (as * (bs * cs))

-- Associativity of * and +
= Tr (ax * bs * cs + bx * cs + cx)
     (ay * bs * cs + by * cs + cy)
     ((as * bs) * cs)

-- Distributivity of * over +
= Tr ((ax * bs + bx) * cs + cx)
     ((ay * bs + by) * cs + cy)
     ((as * bs) * cs)

-- Definition of <>
= (Tr ax ay as <> T b by bs) <> Tr cx cy cs
Now that we have a valid Monoid instance, we can use the higher-level <>
and mempty concepts in our core layout algorithm, rather than worrying over
details like (x, y) coordinates and scaling factors.
The lazy layout
Our main layoutCollage function takes the user-specified tree as input,
and annotates each element with a Transform.
In addition to that, we also produce the Size of the final image so we can
allocate space for it.
layoutCollage
  :: Sized img
  => Collage img
  -> (Collage (img, Transform), Size)
All layoutCollage does is call layout — our circular program — with
the identity transformation:
layoutCollage = layout memptylayout takes the size and position of the current element as an argument,
and determines the sizes and positions of a tree recursively.
There are some similarities with the algorithms present in browser engines, where a parent element will first lay out its children, and then use their properties to determine its own width.
However, we will use Haskell’s laziness to do this in a single top-down pass. We provide a declarative algorithm and we leave the decision about what to calculate when — more concretely, propagating the requested sizes of the children back up the tree before constructing the transformations — to the compiler!
layout
  :: Sized img
  => Transform
  -> Collage img
  -> (Collage (img, Transform), Size)
Placing a single image is easy, since we are receiving the transformation directly as an argument. We return the requested size — which is just the original size of the image. This is an important detail in making the laziness work here: if we tried to return the final size (including the passed in transformation) rather than the requested size, the computation would diverge (i.e. recurse infinitely).
layout trans (Singleton img) =
  (Singleton (img, trans), sizeOf img)
In the recursive case for horizontal composition, we call the horizontal
helper we defined earlier with the left and right image sizes as arguments.
This gives us both transformations, that we can then pass in as arguments to
layout again – returning the left and right image sizes we pass in to the
horizontal helper, forming our apparent circle.
layout trans (Horizontal l r) =
  (Horizontal l' r', size)
 where
  (l', lsize)            = layout (ltrans <> trans) l
  (r', rsize)            = layout (rtrans <> trans) r
  (ltrans, rtrans, size) = horizontal lsize rsize
The same happens for the vertical case:
layout trans (Vertical t b) =
  (Vertical t' b', size)
 where
  (t', tsize)            = layout (ttrans <> trans) t
  (b', bsize)            = layout (btrans <> trans) b
  (ttrans, btrans, size) = vertical tsize bsize
It’s worth thinking about why this works: the intuitive explanation is that we can “delay” the execution of the transformations until the very end of the computation, and then fill them in everywhere. This works since no other parts of the algorithm depend on the transformation, only on the requested sizes.
Conclusion
We’ve written a circular program! Although I was aware of repmin for a long
time, it’s not a technique I’ve applied often. To me, it is quite interesting
because, compared to repmin:
- it is easier to explain to a novice why this is useful;
- it is perhaps easier to understand due to the visual aspect; and
- it is an example outside of the realm of parsers and compilers.
The structure is also somewhat different; rather than having a circular step at the top-level function invocation, we have it at every step of the recursion.
Thanks to Francesco Mazzoli and Titouan Vervack reading a draft of this blogpost and suggesting improvements. And thanks to you for reading!
What follows below are a number of relatively small functions that take care of various tasks, included so this can function as a standalone program:
- Actually rendering the layout back to an image
- Parsing a collage description
- Generating random collages
- Putting together the CLI
- Resizing the result
Appendices
Rendering the result
Once we’ve determined the layout, we still need to apply it and draw all the images using the computed transformations. We use simple nearest-neighbour scaling since that is not the focus of this program, you could consider Lánczos interpolation in a real application.
render
  :: Foldable f
  => Size
  -> f (JP.Image JP.PixelRGB8, Transform)
  -> JP.Image JP.PixelRGB8
render (Sz width height) images = runST $ do
  canvas <- JP.createMutableImage (round width) (round height) black
  for_ images $ transform canvas
  JP.unsafeFreezeImage canvas
 where
  black = JP.PixelRGB8 0 0 0

  transform canvas (img, Tr dstX dstY dstS) =
    for_ [round dstX .. round (dstX + dstW) - 1] $ \outX ->
    for_ [round dstY .. round (dstY + dstH) - 1] $ \outY ->
      let inX = min (JP.imageWidth img - 1) $ round $
                fromIntegral (outX - round dstX) / dstS
          inY = min (JP.imageHeight img - 1) $ round $
                fromIntegral (outY - round dstY) / dstS in
      JP.writePixel canvas outX outY $ JP.pixelAt img inX inY
   where
    dstW = fromIntegral (JP.imageWidth img)  * dstS
    dstH = fromIntegral (JP.imageHeight img) * dstS
Parsing a collage description
We use a simple parser to allow the user to specify collages as a string, for example on the command line. This is a natural fit for polish notation as using parentheses in command line arguments is very awkward.
As an example, we want to parse the following arguments:
H img1.jpg V img2.jpg H img3.jpg img4.jpgInto this tree:
(Horizontal "img1.jpg"
  (Vertical "img2.jpg")
  (Horizontal "img3.jpg" "img4.jpg"))
We don’t even need a parser library, we can just treat the arguments as a stack:
parseCollage :: [String] -> Maybe (Collage FilePath)
parseCollage args = do
  (tree, []) <- parseTree args
  pure tree
 where
  parseTree []             = Nothing
  parseTree ("H" : stack0) = do
    (x, stack1) <- parseTree stack0
    (y, stack2) <- parseTree stack1
    pure (Horizontal x y, stack2)
  parseTree ("V" : stack0) = do
    (x, stack1) <- parseTree stack0
    (y, stack2) <- parseTree stack1
    pure (Vertical x y, stack2)
  parseTree (x   : stack0) = Just (Singleton x, stack0)
Generating random collages
In order to test this program, I also added some functionality to generate random collages.
randomCollage :: RandomGen g => NonEmpty a -> g -> (Collage a, g)
randomCollage ne gen = runStateGen gen $ \g -> go g ne
 where
The utility rc picks a random constructor.
rc g = bool Horizontal Vertical <$> randomM gIn our worker function, we keep one item on the side (x), and randomly decide
if other items will go in the left or right subtree:
  go g (x :| xs) = do
    (lts, rts) <- partition snd <$>
      traverse (\y -> (,) y <$> randomM g) xs
Then, we look at the random partitioning we just created. If they’re both empty, the only thing we can do is create a singleton collage:
    case (map fst lts, map fst rts) of
      ([],       [])       -> pure $ Singleton x
If either of them is empty, we put x in the other partition to ensure we don’t
create invalid empty trees:
      ((l : ls), [])       -> rc g <*> go g (l :| ls) <*> go g (x :| [])
      ([],       (r : rs)) -> rc g <*> go g (x :| []) <*> go g (r :| rs)
Otherwise, we decide at random which partition x goes into:
      ((l : ls), (r : rs)) -> do
        xLeft <- randomM g
        if xLeft
          then rc g <*> go g (x :| l : ls) <*> go g (r :| rs)
          else rc g <*> go g (l :| ls)     <*> go g (x :| r : rs)
Putting together the CLI
We support two modes of operation for our little CLI:
- Using a user-specified collage using the parser we wrote before.
- Generating a random collage from a number of images.
In both cases, we also take an output file as the first argument, so we know
where we want to write the image to. We also take an optional -fit flag so
we can resize the final image down to a requested size.
data Command = Command
  { cmdOut     :: FilePath
  , cmdFit     :: Maybe Int
  , cmdCollage :: CommandCollage
  }

data CommandCollage
  = User   (Collage FilePath)
  | Random (NonEmpty FilePath)
  deriving (Show)
There is some setup to parse the output and a -fit flag. The important
bit happens in parseCommandCollage further down.
parseCommand :: [String] -> Maybe Command
parseCommand cmd = case cmd of
  [] -> Nothing
  ("-fit" : num : args) | Just n <- readMaybe num -> do
    cmd' <- parseCommand args
    pure cmd' {cmdFit = Just n}
  (o : args) -> Command o Nothing <$> parseCommandCollage args
We’ll use R for a random collage, and H/V will be parsed by
parseCollage.
 where
  parseCommandCollage ("R" : x : xs) = Just $ Random (x :| xs)
  parseCommandCollage spec           = User <$> parseCollage spec
Time to put everything together in the main function. First, we do some
parsing:
main :: IO ()
main = do
  args <- getArgs
  command <- maybe (fail "invalid command") pure $
    parseCommand args
  pathsCollage <- case cmdCollage command of
    User explicit -> pure explicit
    Random paths -> do
      gen <- newStdGen
      let (random, _) = randomCollage paths gen
      pure random
Followed by actually reading in all the images:
imageCollage <- readCollage pathsCollageThis gives us the Collage (JP.Image JP.PixelRGB8). We can pass that to our
layout function and write it to the output, after optionally applying our
fit:
  let (result, box) = case cmdFit command of
        Nothing -> layoutCollage imageCollage
        Just f  -> fit f $ layoutCollage imageCollage
  write (cmdOut command) $ JP.ImageRGB8 $ render box result
 where
  write output
    | ".jpg" `isSuffixOf` output = JP.saveJpgImage 80 output
    | otherwise                  = JP.savePngImage output
Resizing the result
Most of the time I don’t want to host full-resolution pictures for web viewing. This is an addition I added later on to resize an image down to a requested “long edge” (i.e. a requested maximum width or height, whichever is bigger).
Interestingly I think this can also be done by having an additional parameter
to layout, and using circular programming once again to link the initial
transformation to the requested size. However, the core algorithm is harder
to understand that way, so I left it as a separate utility:
fit
  :: Int
  -> (Collage (img, Transform), Size)
  -> (Collage (img, Transform), Size)
fit longEdge (collage, Sz w h)
  | long <= fromIntegral longEdge = (collage, Sz w h)
  | otherwise                     =
      (fmap (<> tr) <$> collage, Sz (w * scale) (h * scale))
 where
  long  = max w h
  scale = fromIntegral longEdge / long
  tr    = Tr 0 0 scale